Pin to Board
 I discovered the magic of pickled vegetables on a gray afternoon at a farmer's market in Portland, where a vendor with flour-dusted hands was offering tiny jars of jewel-toned pickles. She handed me a taste of something impossibly crisp and tangy, and I realized right then that these humble vegetables had been transformed into something entirely alive. That evening, I started my first batch in mismatched jars from my cabinet, and by the next morning, my kitchen smelled like vinegar dreams and possibility. Now, whenever I make this feast, I'm transported back to that moment of discovery.
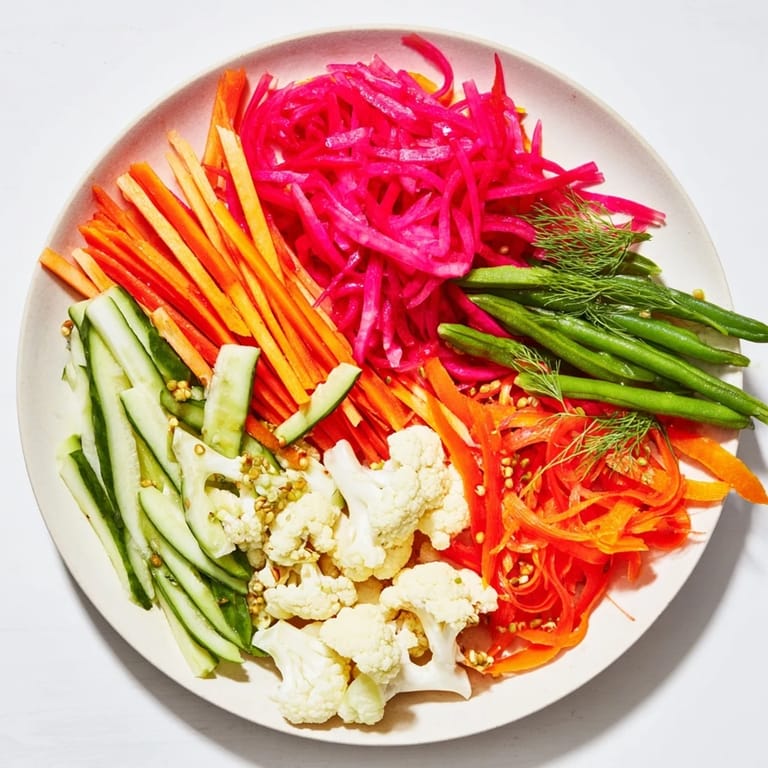
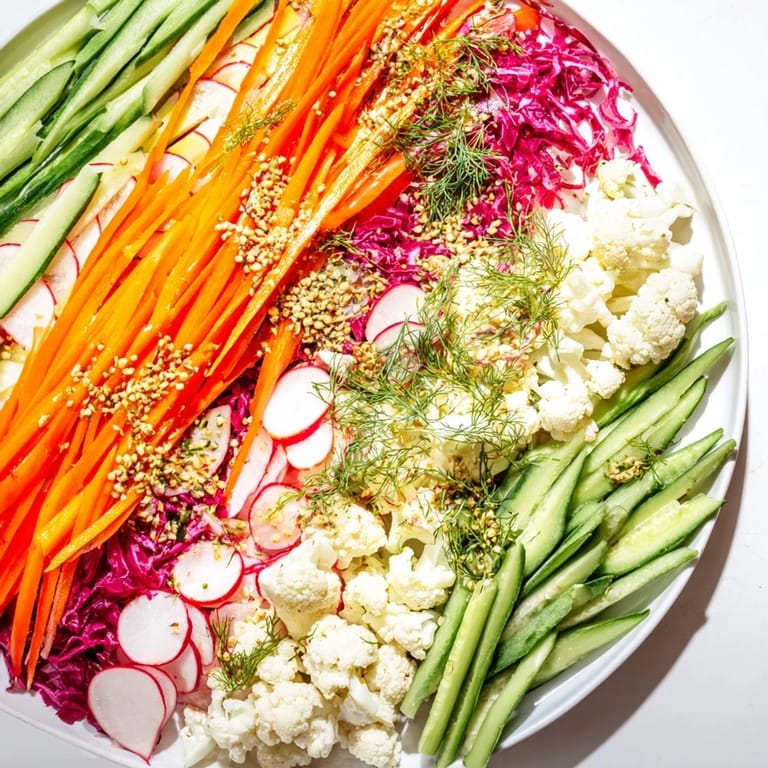
I'll never forget the first time I arranged these pickles on a wooden board for my sister's birthday dinner. She walked in, and instead of heading straight to the main course, she stopped cold in front of the platter. There was something about seeing all those colors—the coral of the carrots, the deep purple of the cabbage, the pale green beans—lined up like edible art that made the whole meal feel special before we'd even started eating.
Ingredients
- Fresh carrots, julienned (1 cup, 120g): Cut them into thin, matchstick-sized pieces so they pickle evenly and stay delightfully crunchy. They'll turn a deeper orange as they sit, almost glowing in the jars.
- Fresh cucumber, sliced (1 cup, 120g): Use a sharp knife and cut them thin so they absorb the brine quickly. Cucumbers are your texture anchor—they stay crisp longer than you'd expect.
- Radishes, thinly sliced (1 cup, 100g): These little wheels keep their peppery bite and add a sophisticated contrast. They're actually better after pickling than fresh.
- Red cabbage, shredded (1 cup, 120g): This is your star for color. It bleeds its gorgeous purple into the brine and looks like edible stained glass when you hold a jar up to the light.
- Cauliflower florets (1 cup, 80g): Keep them small so they pickle all the way through. They become tender but never mushy if you respect their size.
- Green beans, trimmed (1 cup, 120g): Cut them into 2-3 inch lengths so they're easy to pick up and eat. They stay green and vibrant if you don't overcook them.
- White vinegar (2 cups, 480ml): This is the backbone of your brine. It's sharp and clean, letting the vegetable flavors shine through.
- Water (2 cups, 480ml): Use filtered if your tap water is heavily chlorinated, as it can affect the final taste.
- Sugar (2 tbsp, 30g): This isn't about sweetness—it's about balance. It rounds out the vinegar's edge just slightly.
- Kosher salt (2 tbsp, 30g): Don't use table salt; the iodine will cloud your brine and muddy the flavors. Kosher salt is coarser and dissolves beautifully.
- Garlic cloves, sliced (2): Thin slices so they flavor the whole jar evenly. Fresh garlic is essential; don't skip this.
- Mustard seeds (1 tbsp, 10g): Toast them lightly if you want to wake them up, but raw is perfectly fine. They add tiny pops of flavor.
- Coriander seeds (1 tbsp, 10g): These bring an almost floral warmth that makes the whole thing taste sophisticated without being fussy.
- Black peppercorns (1 tsp, 3g): Whole peppercorns are non-negotiable for a clean, spicy finish without that dusty powder taste.
- Bay leaves (2): One per jar or split between them. These are like a quiet voice in the background, anchoring everything.
- Fresh dill (3 sprigs): Dill and pickles are a love story that never gets old. It brings a gentle herbaceous note.
- Red chili, sliced (1 small, optional): If you want heat, this is where it comes from. The longer it sits, the spicier it becomes.
Tired of Takeout? 🥡
Get 10 meals you can make faster than delivery arrives. Seriously.
One email. No spam. Unsubscribe anytime.
Instructions
- Gather and prep your vegetables:
- Wash everything under cool running water and pat dry thoroughly. Wetness on the vegetables can dilute your brine, so don't skip this step. Cut with a sharp knife—dull blades will crush and bruise delicate vegetables, and they'll release their juices before you want them to. Arrange your cut vegetables on the counter so you can see all your colors together. This is when you'll feel like an artist.
- Make your pickling brine:
- Pour the vinegar and water into a saucepan and bring it to a gentle boil over medium heat. You'll smell the sharpness of the vinegar rise up, and that's exactly what you want. Add the sugar and salt, stirring slowly until they dissolve completely—you want no grainy texture at the bottom. This takes about 2-3 minutes. Remove from heat and let it cool for about 5 minutes. You want it warm but not hot enough to cook the vegetables.
- Pack your jars like you're telling a story:
- Use clean glass jars or small bowls with tight-fitting lids. This is where the magic happens. Start with one color at the bottom—let's say the radish slices. Layer them in a way that makes you happy. Add the carrots next, then the cauliflower, the green beans standing up like little soldiers, and the red cabbage creating pockets of color throughout. If you're using the optional fermented vegetables, nestle them in now too. Fill each jar until the vegetables come up to about an inch from the rim.
- Season each jar individually:
- Divide the garlic slices, mustard seeds, coriander seeds, peppercorns, bay leaves, dill sprigs, and chili (if using) evenly among your jars. Don't be shy—distribute them so every jar gets its fair share. These aromatics are going to perfume everything.
- Pour the brine with intention:
- Slowly pour the warm brine over the vegetables, watching it fill the spaces and catch the light. Pour until every vegetable is completely submerged—anything poking above the brine will get exposed to air and might develop mold. You want every piece swimming in that tangy liquid.
- Seal and cool:
- Put the lids on and let the jars cool to room temperature on your counter. You might hear little cracking sounds as the lids seal; that's the sound of things working perfectly. Once cool, transfer to the refrigerator.
- Let time do the work:
- For quick pickles, wait at least 12 hours. The flavor gets noticeably deeper at 24 hours and even better at 48 hours. If you're fermenting instead (using the 2% salt brine method), leave the jars at room temperature for 5-7 days, opening the lid daily to release gases. You'll see bubbles—that's the good bacteria at work.
- Arrange for the feast:
- When you're ready to serve, arrange the pickles in their jars or in small bowls on a wooden board or platter. Line them up in a grid or create a linear pattern—whatever makes your table look like the cover of a magazine. The visual presentation is half the magic.
 Pin to Board
 There was a moment last summer when my neighbor knocked on my door asking what smelled so good, and I realized the whole hallway had filled with the aroma of vinegar and dill. I handed her a jar, and she came back three days later asking for the recipe. That's when I understood that pickled vegetables aren't just food—they're a small gift you give to yourself and others, a way of preserving the season and sharing something that tastes like care.
Choosing Your Vegetables
The beauty of this dish is that it's endlessly adaptable to what's in season and what you have on hand. In summer, I use tender young green beans and crisp cucumbers. In fall, I add beets for their jewel-toned color and earthiness, and pearl onions for their subtle sweetness. Winter is perfect for hardy vegetables like turnips and Brussels sprouts cut in half. The key is choosing vegetables that are firm and fresh—something that's already wilting won't improve in the brine. Think of your vegetables as a canvas, and the brine as the medium that brings them to life. Each vegetable will pickle at its own pace, so cutting them to similar thicknesses ensures they all reach peak crunchiness at the same time.
Vinegar and Flavor Variations
White vinegar is my go-to for its clean, sharp clarity, but once you understand the basic technique, you can explore. Apple cider vinegar brings a warmer, slightly funky complexity that makes the vegetables taste almost wine-like. Rice vinegar creates a gentler, rounder flavor that lets the vegetables themselves shine through. I've even used white wine vinegar, which adds a subtle sophistication. The spices matter just as much as the vinegar. Try swapping coriander seeds for fennel seeds, or add whole cloves for a warmer spice profile. Some days I'll add a strip of lemon zest or a few juniper berries. The brine is your playground, and every experiment teaches you something about your own palate.
Serving and Storage
These pickles are at their peak from day 2 through day 7, when they're crunchy but fully flavored. After that, they continue to develop depth, becoming more tender and more vinegary—which is exactly what some people prefer. I've kept jars in my refrigerator for weeks, and they're still delicious, though progressively softer. Serve them on a board with crusty bread, creamy cheeses, cured meats, or alongside a simple salad. They're the perfect palate cleanser between rich bites. For a vegan feast, pair them with hummus, grains, and fresh herbs. If you're serving wine, these pickles love a crisp Riesling, a dry rosé, or even a light pilsner beer. They make everything taste brighter.
- Keep your jars refrigerated once they're cool, and they'll stay fresh and crunchy for up to three weeks.
- Always use a clean spoon to remove vegetables; don't let your fingers get into the brine, as bacteria from your hands can cause spoilage.
- If you're fermenting instead of quick-pickling, keep the jars in a cool spot away from direct sunlight and taste them daily after day 3 to catch them at the crunch you prefer.
 Pin to Board
 This feast is more than a recipe—it's a permission slip to slow down and engage your senses. The moment you bite into something you pickled yourself is the moment you realize you've learned something about patience and flavor that no restaurant can teach you.
Common Questions
- → What vegetables work best for pickling and fermenting?
Vegetables with firm textures like carrots, cucumbers, radishes, cabbage, cauliflower, and green beans are ideal for pickling and fermenting as they retain crunch and absorb flavors well.
- → How long should I ferment vegetables for optimal flavor?
Fermentation typically takes 5 to 7 days at room temperature; this develops deeper tangy notes and natural probiotics while maintaining vegetable crunch.
- → Can I adjust the spice levels in the brine?
Yes, you can customize spices such as chili or mustard seeds based on your preferred heat and aroma intensity for more personalized flavors.
- → What is the purpose of using both pickling and fermentation methods?
Pickling provides quick tangy flavor within hours, while fermentation develops complex sourness and probiotics over several days, allowing choice of flavor depth.
- → How should I store the pickled or fermented vegetables?
After pickling or fermentation, keep the vegetables sealed in glass jars and refrigerated to preserve freshness and extend shelf life.