 Pin to Board
 My daughter discovered these at a holiday market, and I watched her eyes light up at the sheer whimsy of them—chocolate bars stacked like little evergreens, dripping with chocolate and crowned with a star. We came home that afternoon and decided right then that we'd make our own version, turning them into a kitchen project that felt more like play than cooking. The beauty of it is that they're so simple, yet they look like you spent hours in some fancy candy shop perfecting them. Within minutes of assembling the first tree, we both understood why kids go wild for these.
A few years later, I brought a batch to our neighborhood cookie exchange and watched grown adults genuinely debate whether to eat them or display them on a shelf. That's when I realized these aren't just treats; they're little edible decorations that people actually want to make again and again. The kitchen filled with chocolate-melting steam and the sound of my nieces arguing playfully over who got to place the star on top.
Ingredients
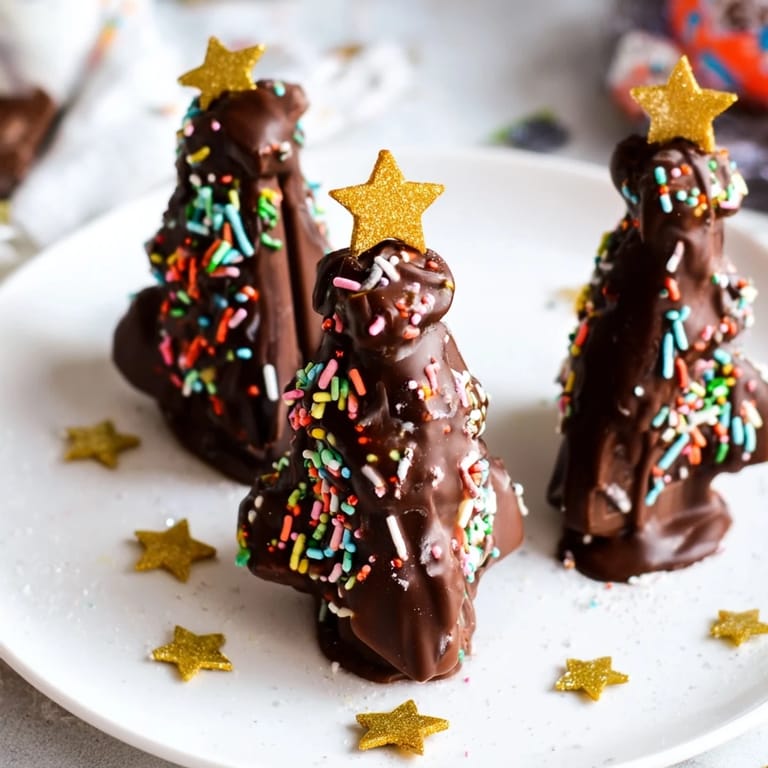
- 24 mini Kinder chocolate bars: The foundation of your trees—these are stacked for both structure and visual impact, so don't swap for something too soft or they'll collapse under their own weight.
- 150 g dark or milk chocolate, chopped: This is your drizzle base; I've learned that chopping it small helps it melt faster and more evenly than using chips, which can seize up.
- 1 tsp coconut oil: A small secret that makes chocolate flow beautifully without thinning its flavor—optional but honestly worth keeping on hand.
- 3 tbsp festive sprinkles or edible glitter: The personality of your trees lives here; pick colors that match your mood or your dining room.
- 8 mini chocolate or candy stars: These crown the whole thing, so choose ones you'd actually want to eat since they're the grand finale.
Tired of Takeout? 🥡
Get 10 meals you can make faster than delivery arrives. Seriously.
One email. No spam. Unsubscribe anytime.
Instructions
- Set up your stage:
- Line a tray with parchment paper so your finished trees won't stick and can chill undisturbed. I like leaving generous space between each one so the drizzle doesn't accidentally glue trees together.
- Unwrap and stack your chocolate:
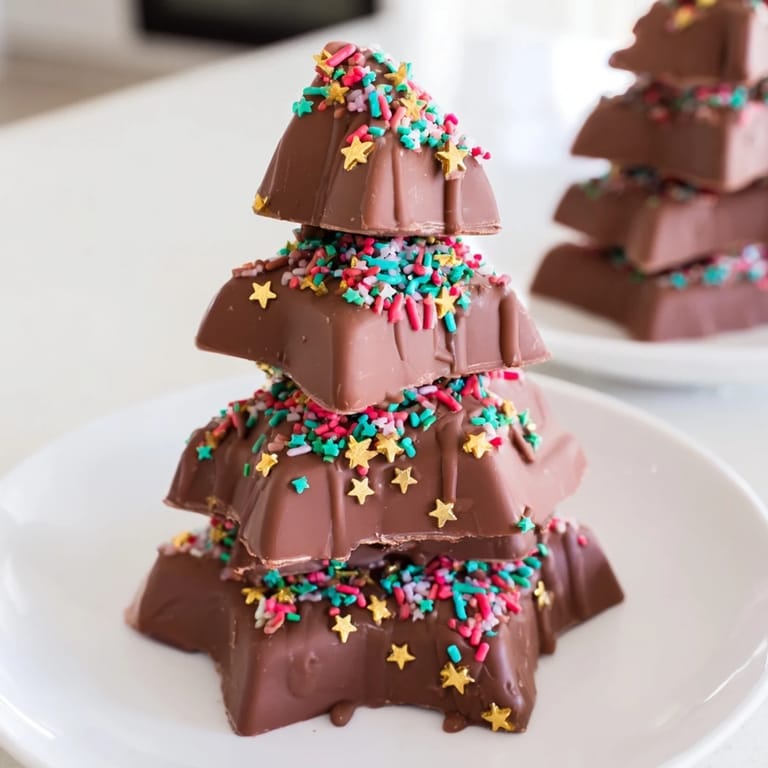
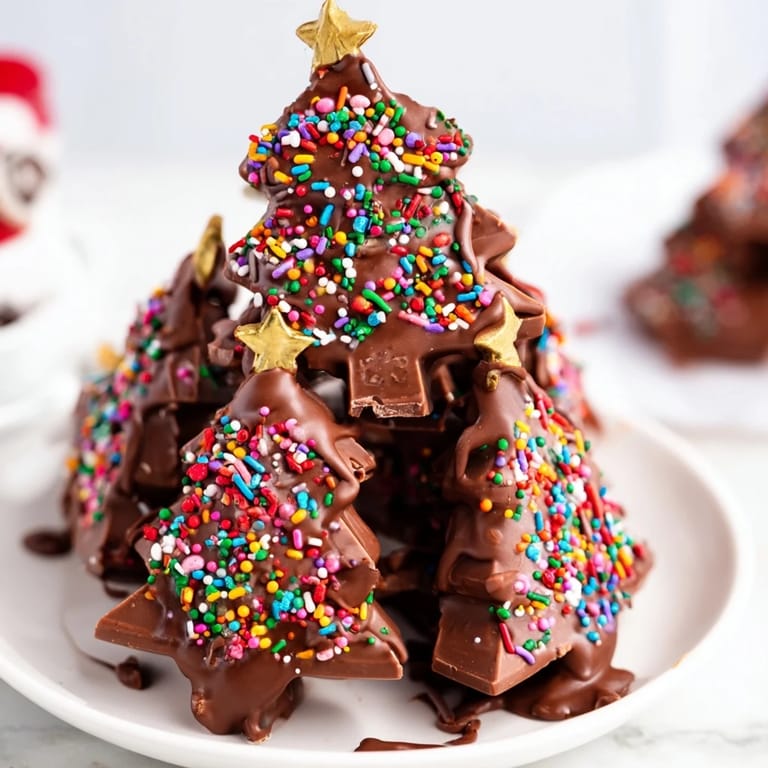
- Unwrap all 24 bars first—it's oddly satisfying and prevents mid-assembly scrambling. For each tree, stack three bars vertically, with the middle one broken in half and angled to form a triangular tree shape; it doesn't have to be perfect, just recognizable as a tree.
- Arrange on your workspace:
- Place each stack on the parchment-lined tray, spaced well apart so there's room for your drizzle to cascade down and pool at the base without running into the next tree.
- Melt your chocolate gently:
- Either use a double boiler (heatproof bowl over simmering water) or microwave in short 20-second bursts, stirring between each burst. Watch it closely—chocolate hates sudden heat and will go grainy if it overheats.
- Drizzle with intention:
- Using a spoon or piping bag, let the chocolate cascade down the stacked bars like melted branches. Work quickly but not frantically; the chocolate has a small window before it starts to set.
- Decorate while it's still warm:
- Immediately scatter sprinkles over the still-wet chocolate and top each tree with its star before the drizzle firms up. This is where it transforms from just stacked chocolate into something magical.
- Chill until set:
- Slide the tray into the fridge for 10–15 minutes; you're looking for the chocolate to feel firm to the touch but not rock-hard.
- Serve with joy:
- Remove from the fridge and serve as is, or let them come to room temperature if you prefer softer chocolate.
 Pin to Board
 There's a particular kind of magic in watching someone open a box of these trees and actually gasp—it's not complicated food, but it feels like a gift from someone who cared enough to be creative. My son once refused to eat his because he'd named it and decided it deserved to be admired first.
Why This Works as Holiday Magic
These trees tap into something deeply satisfying about edible decorations—they're festive without being fussy, impressive without being intimidating. The stacked structure creates natural height and drama, while the drizzle gives them that artisanal, hand-made feel that store-bought candy simply can't match. It's one of those rare recipes where effort and outcome feel completely out of proportion in your favor.
Customization That Actually Makes Sense
Swap the Kinder bars for any mini chocolate bars you love—I've made versions with raspberry-filled bars, salted caramel, even some nutty options. The chocolate drizzle can be white, milk, or dark depending on your preference or what you have lurking in the cupboard. Different sprinkles completely change the vibe: go with classic red and green for traditional festive, pastels for spring, or jewel tones if you want them to look like little edible gems.
Storing and Gifting
These keep beautifully in an airtight container in a cool spot for up to a week, which makes them perfect for making ahead or building a small gift collection. I've arranged them in a pretty box with tissue paper as thank-you gifts for teachers, neighbors, and friends—they always feel special because they look homemade and thoughtful. A simple tag explaining they're chocolate-stacked trees makes people smile before they even taste them.
- Keep them away from warm areas or direct sunlight so the chocolate doesn't soften or bloom.
- If you're gifting them, layer parchment between each tree to prevent sticking.
- Make extra because they disappear faster than you'd think, especially if kids are around.
 Pin to Board
 These little trees prove that the best holiday treats aren't about complexity; they're about bringing people together around something joyful and simple. Make them, share them, and watch everyone's face light up exactly the way my daughter's did.