 Pin to Board
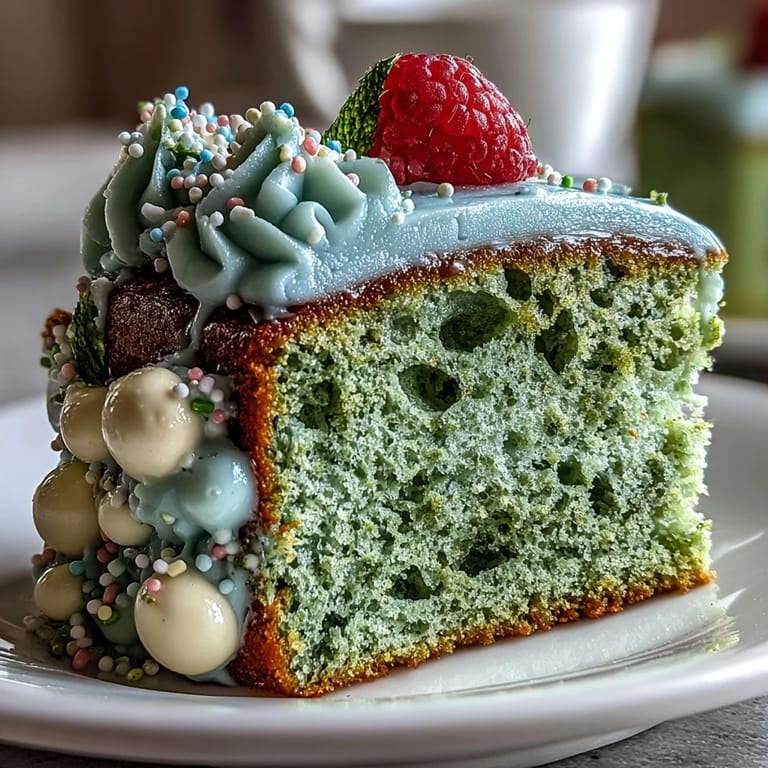
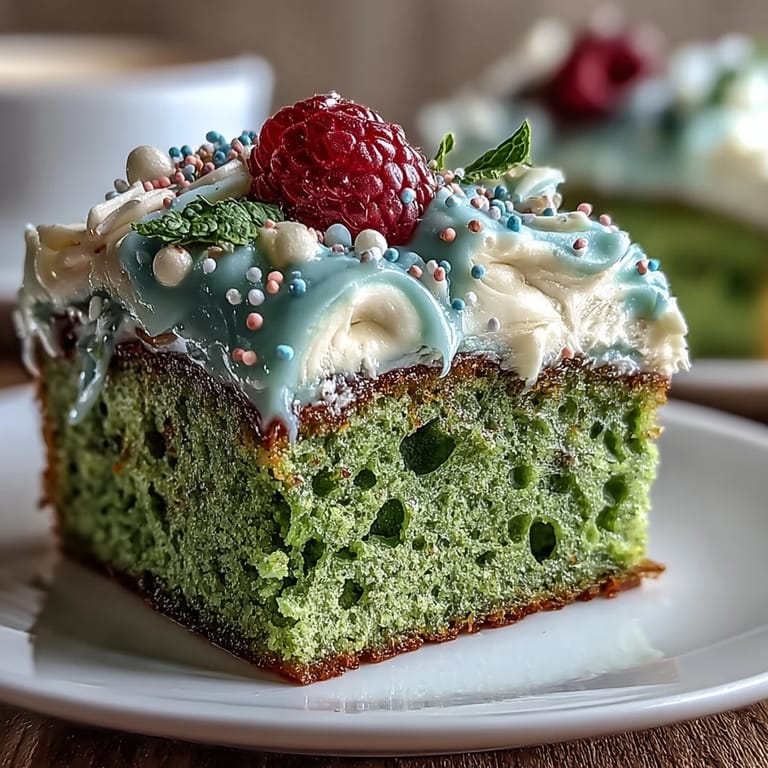
 There’s something about the quiet hum of the kitchen on a Sunday morning that makes trying new recipes irresistible. I never pictured myself making a smash cake—those messy, photo-ready treats are usually reserved for toddlers’ birthdays. But one sunny brunch, inspiration struck when I craved a playful twist to classic sweets, blending the mellow bitterness of matcha with the comfort of vanilla frosting. My hands dusted with green powder, I couldn’t help but grin at how grown-up brunch got a little whimsical. Now, this mini matcha smash cake is my staple for celebration mornings, laughter and all.
Once, when I made this cake for a friend’s impromptu birthday brunch, the gentle whir of the mixer was drowned out by our chatter about favorite travel mishaps. We ended up crowning the mini cake with a heap of sprinkles and, instead of slicing it neatly, laughed over smashing the first forkful just like kids.
Ingredients
- All-purpose flour: Sift it well to keep the cake light; I’ve learned lumpy flour makes dense bites.
- Granulated sugar: Sweetens the cake without overshadowing the matcha’s earthy charm.
- Baking powder & baking soda: These tiny lifts make all the difference for airy layers—double-check freshness for the perfect rise.
- Salt: Just a pinch brightens the flavors; forget it and you’ll notice something missing.
- Matcha powder (culinary grade): The vivid color and grassy flavor shine, so pick a good one, not the cheap stuff for lattes.
- Whole milk: Adds tenderness; bring to room temp so the cake mixes up smooth.
- Large egg: Binds everything together and gives structure—let it warm up on the counter first.
- Vegetable oil: Keeps the crumb moist longer than butter ever could.
- Vanilla extract: Softens the matcha with its aroma and comforting notes.
- Unsalted butter: Creamy frosting depends on butter that’s just soft enough to beat smooth.
- Powdered sugar: Sifting avoids surprise lumps in your dreamy icing.
- Milk: Loosens the frosting for spreading; a splash goes a long way.
- Pinch of salt (for frosting): This tiny bit balances all the sweetness.
- Sprinkles or fresh berries (optional): I find they turn the cake into a real celebration, but even without, the layers alone feel festive.
Tired of Takeout? 🥡
Get 10 meals you can make faster than delivery arrives. Seriously.
One email. No spam. Unsubscribe anytime.
Instructions
- Prep the pans:
- Slide parchment rounds into two greased 4-inch pans so your tender cakes pop out with no drama later.
- Mix the dry ingredients:
- Whisk flour, sugar, baking powder, baking soda, salt, and matcha in a bowl while the specks mingle into a pale green cloud.
- Combine the wet ingredients:
- In a separate bowl, whisk together milk, egg, oil, and vanilla until the surface glints a bit—no streaks remaining.
- Bring it all together:
- Pour wet into dry and fold gently until just combined; the batter should be smooth but not over-stirred, avoiding a tough cake.
- Divide and smooth:
- Spoon the batter into pans, gently smoothing the tops—the vivid green feels almost too pretty to bake.
- Bake the cakes:
- Place in a 350°F oven for about 15–20 minutes, until a toothpick pulls out clean and the tops spring back under a light tap.
- Cool completely:
- Let cakes sit for 5 minutes, then turn onto a rack to finish cooling—don’t rush or the frosting will melt off.
- Whip up the frosting:
- Beat soft butter until creamy, then gradually add sifted powdered sugar for a silky texture before finishing with milk, vanilla, and a pinch of salt.
- Assemble and decorate:
- Spread frosting between the cake layers and over the top and sides with an offset spatula; add sprinkles or berries if you want a bit of sparkle.
- Celebrate and enjoy:
- Bring to the table, hand out forks—or just let everyone dig in with their hands for a bit of joyful smashing.
 Pin to Board
 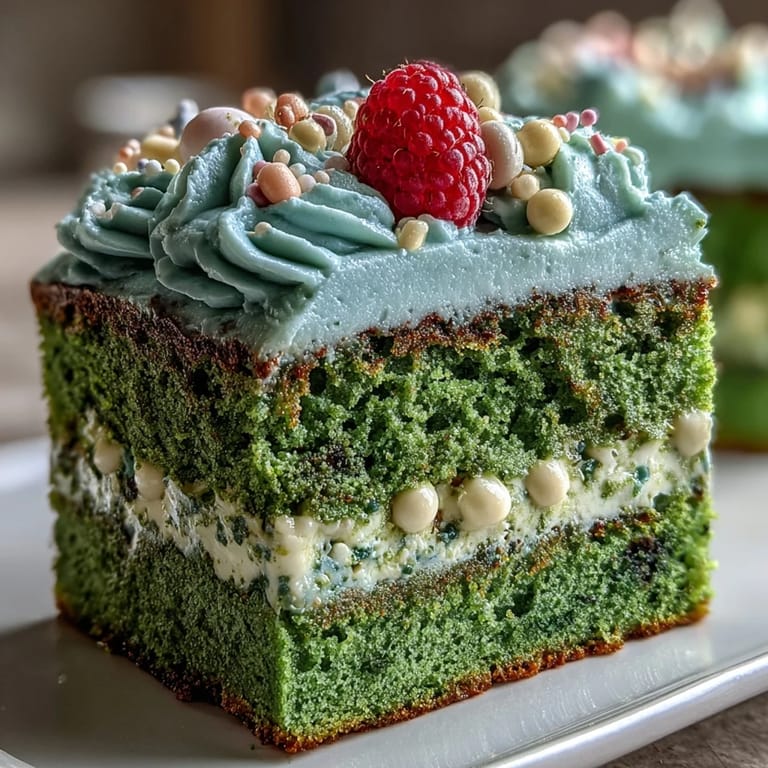 Pin to Board
 The first time the cake disappeared in laughter and green-tinged fingers, the brunch stretched into late afternoon. It reminded me that simple, playful baking can turn an ordinary morning into a cheerful memory long after the last crumb is gone.
Making the Most of Brunch Celebrations
Mini cakes make everyone feel like the guest of honor, no matter the occasion. There’s an unspoken thrill in giving grown-ups permission to play with their food, especially with something as vibrant as matcha.
How to Get the Perfect Smash
If you want the cake to really “smash,” don’t overbake—it should be soft and springy in the center, not dry. Chilling the frosted cake just a bit makes the layers easier to handle but still smashable for those dramatic moments.
Little Tricks for Big Results
Warming the egg and milk to room temperature keeps everything blended smoothly, so your cake bakes up light. Sifting matcha avoids green flecks and ensures an even crumb. Don’t forget, it’s okay if the frosting isn’t perfectly smooth—the charm is in the homemade look.
- Let the cakes cool fully before icing for plush, tidy layers.
- Use an offset spatula for smoother sides, or let swirls stay for a rustic look.
- Serve right after frosting for the freshest flavor and most inviting texture.
 Pin to Board
  Pin to Board
 Whether for birthdays or a spontaneous brunch, this mini matcha cake always invites smiles and sharing. Don’t forget—the best part is getting a little messy together.
Common Questions
- → Can I make this dairy-free?
Yes. Substitute plant-based milk and vegan butter in the frosting and cake batter; chill the assembled cake briefly if the frosting needs to firm up before serving.
- → How can I intensify the matcha flavor?
Use a high-quality culinary matcha and sift it to avoid lumps. Increasing the matcha by 1/2 to 1 teaspoon adds a brighter, more pronounced green tea note.
- → How do I avoid overmixing the batter?
Combine wet and dry ingredients until just incorporated; a few small streaks are fine. Overmixing develops gluten and yields a denser crumb.
- → Any tips for baking in two 4-inch pans?
Grease and line the pans, divide batter evenly, and bake until a toothpick comes out clean (15-20 minutes). Let cakes cool 5 minutes in the pans, then turn out onto a rack to cool completely.
- → Can I prepare components ahead of time?
You can bake the layers and make the frosting a few hours ahead. Store layers wrapped in the fridge and bring to room temperature before frosting for best texture.
- → What texture should the frosting have?
A light, fluffy buttercream that spreads easily is ideal. Beat until smooth and slightly airy for a thin crumb coat and clean layers suited to a smash-style presentation.