 Pin to Board
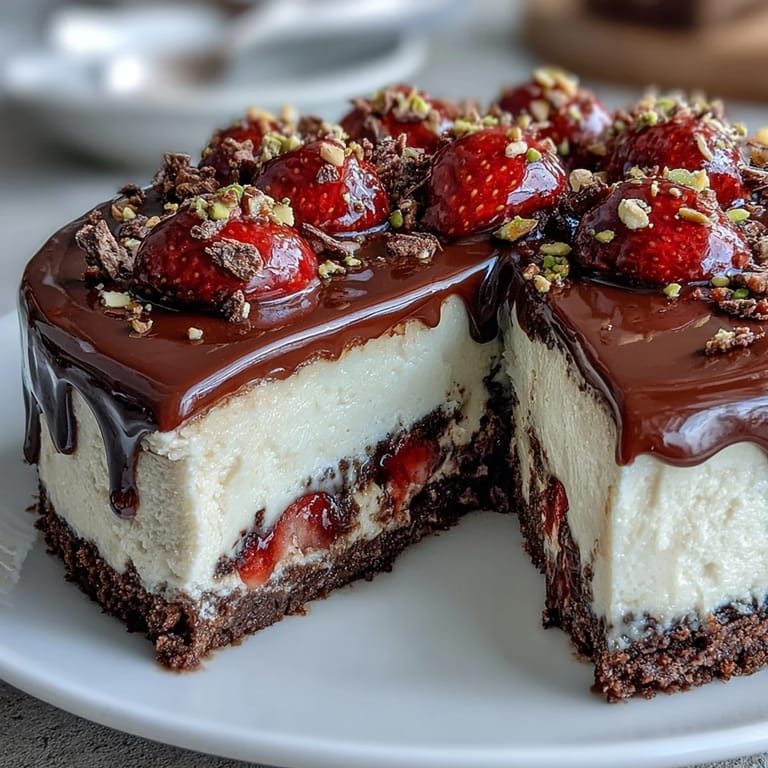
 My friend returned from Dubai with stories about gold-dusted everything and desserts that tasted like luxury in edible form. She kept raving about chocolate and strawberry combinations that felt both indulgent and impossibly fresh, so one afternoon I decided to recreate that magic in my own kitchen using what I had on hand. The result was these little cups that somehow taste like a five-star hotel dessert but take barely any real effort to assemble. They've become my go-to when I want to impress without actually stressing, and honestly, they disappear faster than I can make them.
I made these for a small gathering last spring, and watching my neighbor take one bite then immediately ask for the recipe felt like winning an invisible cooking award. She kept saying it tasted like something from a pastry shop, which made me laugh because I literally just layered things in a cup while standing in my kitchen. That moment reminded me that sometimes the simplest preparations make the biggest impression, especially when every single ingredient is chosen with intention.
Ingredients
- Chocolate digestive biscuits (150g): These are the backbone of your base, and crushing them to varied sizes (not powder-fine) gives better texture and keeps things from feeling too dense.
- Unsalted butter (50g, melted): The glue that holds your crumb base together without adding any competing flavors.
- Cream cheese (250g, softened): Bring this to room temperature first or you'll spend ten minutes fighting lumps that shouldn't exist.
- Powdered sugar (80g): This dissolves faster than granulated and creates that smooth, cloud-like texture you're after.
- Heavy cream (200ml, cold): Keep it refrigerated until the last moment; whipping cold cream to soft peaks takes half the time and holds its shape longer.
- Vanilla extract (1 tsp): A small amount that reminds you this is comfort food, not just chocolate and fruit.
- Fresh strawberries (200g sliced, plus 6 whole for garnish): Choose ones that are ripe but still firm enough to hold their shape after sitting with sugar.
- Dark chocolate (80g, chopped): Chop it small and evenly so it melts smoothly into the cream without overheating.
- Chocolate shavings and pistachios (optional): These aren't strictly necessary, but they add that visual touch that makes people pause before eating.
Tired of Takeout? 🥡
Get 10 meals you can make faster than delivery arrives. Seriously.
One email. No spam. Unsubscribe anytime.
Instructions
- Build your foundation:
- Mix the crushed biscuits with melted butter until everything looks like wet sand, then press firmly into the bottom of each cup. Don't be timid here; you want a compact base that won't crumble when your spoon meets it.
- Create the cheesecake cloud:
- Beat the softened cream cheese with powdered sugar until completely smooth and any resistance disappears. In another bowl, whip the cold heavy cream with vanilla until soft peaks form, then fold it gently into the cheese mixture using a spatula in slow, patient strokes until ribbons of cream disappear and you have something fluffy.
- Layer with intention:
- Spoon or pipe the cheesecake filling over your biscuit base, smoothing it level with the back of a spoon. This is where it stops looking like ingredients and starts looking like dessert.
- Macerate the strawberries:
- Toss your sliced strawberries with sugar and let them sit for ten minutes so they release their juice and become slightly jammy. This step transforms ordinary berries into something more complex and alive.
- Make the chocolate ganache:
- Heat the heavy cream until it just begins to steam, pour it over your chopped chocolate, and wait exactly one minute before stirring. This patience ensures your ganache becomes glossy and silky instead of broken and grainy.
- Assemble the layers:
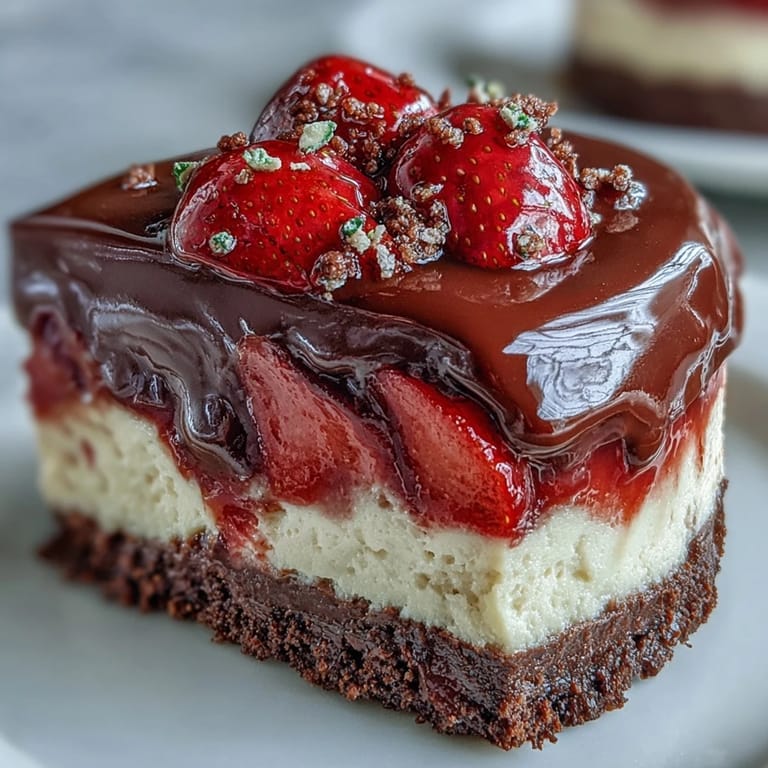
- Distribute the macerated strawberries evenly across the cheesecake, then spoon a thin layer of slightly cooled ganache over top. Let the chocolate pool naturally into the gaps.
- Chill and set:
- Refrigerate for at least two hours until everything firms up and the flavors have time to settle into each other. This waiting period is non-negotiable and worth every minute.
- Final flourish:
- Top each cup with a whole strawberry, chocolate shavings, and crushed pistachios if you're feeling it. Serve cold and watch people genuinely pause before taking their first bite.
 Pin to Board
 There's something genuinely moving about turning simple ingredients into something that tastes expensive without actually being difficult, and these cups do exactly that. They've shifted from being just a recipe I made once to something I reach for whenever I need to feel accomplished in the kitchen.
Why These Cups Changed My Dessert Game
Before I made these, I thought impressive desserts required fancy equipment or hours of precision work. Then I realized that layering is actually easier than baking, timing is more forgiving, and you get to taste everything as you build it. The no-bake aspect means I can make them on hot days without heating up my kitchen, and the individual cup format means no one has to watch me try to cut a cake into even slices.
The Art of Customization
The moment I understood these cups as a template rather than a prescription changed everything. I've swapped the strawberries for raspberries, added a whisper of cardamom to the filling for that Dubai nod, and once crumbled pistachio brittle into the base layer. Each version felt like a small experiment that deepened my understanding of how flavors and textures actually work together, teaching me that confident substitutions come from understanding why each ingredient matters.
Making Them Ahead and Serving With Ease
These cups are the friend who shows up early to the party and helps you set up instead of adding to your stress. I often prepare them the morning of an evening gathering, and they're completely ready by the time guests arrive, which means I can actually enjoy my own party. The beauty of serving them in individual cups is that people don't need forks or plates or any of the logistics that usually make hosting feel complicated.
- Make these up to 24 hours ahead and keep them covered in the refrigerator so they don't absorb any stray flavors.
- If you're adding pistachios, wait until just before serving or they'll soften from the moisture in the layers.
- Serve them straight from the cold, because temperature is part of what makes every bite feel like a small moment of luxury.
 Pin to Board
 These little cups prove that dessert doesn't need to be complicated to be memorable. Make them for someone, watch their face when they taste that first spoonful, and understand why I keep coming back to this recipe.
Common Questions
- → What kind of biscuits work best for the base?
Chocolate digestive biscuits or chocolate graham crackers provide a crunchy, flavorful foundation that complements the creamy layers.
- → How can I make the filling smooth and creamy?
Beat cream cheese with powdered sugar until smooth, then gently fold in whipped heavy cream and vanilla extract for lightness.
- → Can I prepare the cups in advance?
Yes, the cups can be assembled up to 24 hours ahead and chilled to let flavors meld before serving.
- → How is the ganache made for the topping?
Heat heavy cream until simmering, pour over chopped dark chocolate, let sit briefly, then stir until glossy and smooth.
- → Are there ways to add texture or flavor variations?
Adding crushed pistachios between layers or a pinch of cardamom to the filling introduces nutty notes and aromatic warmth.