 Pin to Board
 My neighbor knocked on my door one summer evening with that look—the one that says she's been experimenting in her kitchen. She held out a still-warm cookie that looked like a campfire had happened on top of it, melted marshmallow oozing down the sides of what was clearly a brownie base. One bite and I was transported to late nights around actual campfires, except this time I didn't need to balance graham crackers and chocolate bars on a stick. She laughed and said she'd made them from a box mix, doctored them up a bit, and suddenly had something completely crave-worthy.
I made these for my daughter's school bake sale, nervous they'd be too unusual for the crowd. A kid came back to our house the next day asking if his mom could get the recipe because he'd never had a cookie like it. Watching him describe the marshmallow part to his friends with actual reverence made me realize I'd stumbled onto something special—a recipe that feels homemade and adventurous but comes together in under 30 minutes.
Ingredients
- 1 box brownie mix (18–20 oz): The shortcut that makes this recipe possible; it removes the guesswork of getting the base exactly right so you can focus on the fun toppings.
- 2 large eggs: They bind everything together and keep the cookies tender rather than cake-like.
- 1/3 cup vegetable oil: This creates the chewy texture; don't skip it or substitute with butter, as the oil is what makes these cookies stay soft and fudgy.
- 1 tablespoon water: A small addition that keeps the dough from being too thick and helps everything combine smoothly.
- 1/2 cup semi-sweet chocolate chips: They melt slightly during baking and add pockets of richness; use good quality chips if you can, as they make a noticeable difference.
- 1/2 cup crushed graham crackers (about 4 sheets): This is what bridges brownie and s'mores; crush them by hand for texture variation, not into a fine powder.
- 18 large marshmallows: One marshmallow per cookie, pressed on while the cookies are still warm so they sink in slightly and stay put.
- 1/4 cup mini chocolate chips and 1/4 cup crushed graham crackers (optional garnish): These finish the cookies with visual appeal and extra flavor bursts, but they're truly optional if you're in a hurry.
Tired of Takeout? 🥡
Get 10 meals you can make faster than delivery arrives. Seriously.
One email. No spam. Unsubscribe anytime.
Instructions
- Get your oven ready:
- Preheat to 350°F and line two baking sheets with parchment paper. This temperature is just right for the cookies to set without browning too much while the marshmallows have time to puff.
- Mix your base:
- In a large bowl, combine the brownie mix, eggs, oil, and water until just combined—you're looking for no dry streaks of mix remaining but not overmixing, which toughens the dough. It should look like thick, glossy brownie batter.
- Fold in the good stuff:
- Gently fold the chocolate chips and crushed graham crackers into the dough with a spatula, being careful not to deflate any air you've worked in. You want to see the graham cracker bits distributed throughout.
- Scoop and space:
- Using a tablespoon or small cookie scoop, drop heaping mounds onto your prepared sheets about 2 inches apart; you should get roughly 18 cookies. Remember they'll spread slightly, so don't crowd them.
- Bake the base:
- Bake for 8 to 9 minutes until the cookies look just set on top but still have a slight jiggle in the center when you gently shake the pan. They should look slightly underbaked because they'll continue cooking when the marshmallows go on.
- Add the marshmallows:
- Remove the hot pan from the oven and immediately press one large marshmallow firmly into the center of each warm cookie so it sinks in slightly. Work quickly so the cookies are still warm enough for the marshmallow to stick.
- Melt the tops:
- Return the pan to the oven for 1 to 2 minutes until the marshmallows puff up and just start to melt slightly. You'll see them expand like little pillows.
- Optional golden finish:
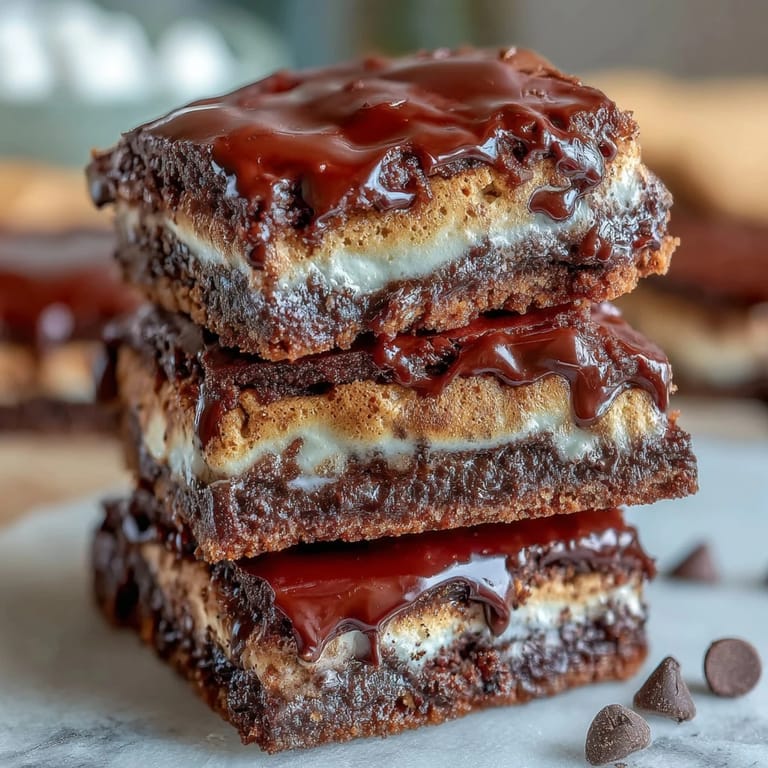
- If you want that toasted campfire look, carefully switch to the broiler for about 30 seconds, watching the entire time—marshmallows go from melted to charred faster than you'd think. Use a kitchen torch if you prefer more control over the browning.
- Garnish while warm:
- The moment cookies come out of the oven, sprinkle mini chocolate chips and extra graham cracker crumbs on top if using; they'll stick to the warm marshmallow. This step is optional but adds extra visual appeal and flavor.
- Cool with patience:
- Let cookies cool on the baking sheet for 5 minutes so the marshmallow sets slightly and the cookie firms up enough to move. Transfer to a wire rack to finish cooling, about 15 minutes total before they're sturdy enough to handle without the marshmallow sliding off.
 Pin to Board
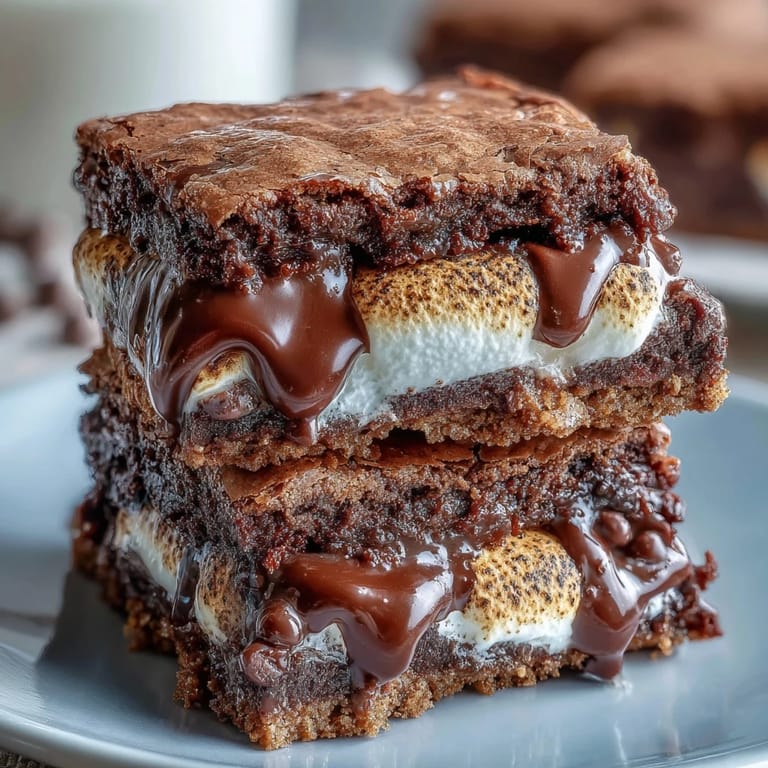
 There's something unexpectedly magical about the moment you bite into one of these and hit that contrast—dense, fudgy brownie base, crunchy graham cracker pieces, then that gooey warm marshmallow layer. My friend texted me a photo days later of her making them again with her kids, marshmallow on their fingers, and I realized this recipe had become something she'd pass on.
Why These Cookies Feel Like More Than They Are
Using a box mix doesn't feel like cheating once you see how much personality you add with just two customizations. The graham crackers and chocolate chips transform the batter from generic brownie to something distinctly s'mores-inspired, while the marshmallow topping makes people think you fussed much more than you actually did. This is the kind of recipe that builds confidence in newer bakers because the mix handles the heavy lifting while you focus on the creative fun.
Storage and Keeping These Around
Store cooled cookies in an airtight container at room temperature for up to 3 days, though honestly they rarely last that long. The marshmallow tops soften slightly over time and the cookies begin to firm up, which some people prefer. If you want to make them ahead, bake and cool the cookies without the marshmallow, then top and toast them the day you're serving—this keeps that fresh-from-the-oven marshmallow texture intact.
Customizations and Variations That Work
Once you nail the base recipe, there are small tweaks that change the flavor entirely. Add a pinch of cinnamon to the batter for warmth, swap in dark chocolate chips for sophistication, or use crushed Honey Graham crackers if you want subtle sweetness. If you have a kitchen torch and want to get creative, you can toast just the marshmallow tops like you're actually at a campfire.
- A tiny pinch of sea salt sprinkled on the warm marshmallow before it cools adds complexity and cuts the sweetness.
- If you want extra crunch, press a few mini chocolate chips into the marshmallow before it fully sets.
- Experiment with marshmallow alternatives like flavored marshmallows or marshmallow fluff if you're feeling adventurous.
 Pin to Board
 These cookies prove that some of the best recipes come from simplifying traditional desserts without losing what makes them special. Make a batch this weekend and watch how quickly they disappear.
Common Questions
- → What makes these cookies chewy?
The use of brownie mix combined with eggs and oil creates a dense, moist dough that results in chewy cookies once baked.
- → How do I achieve the toasted marshmallow topping?
After baking, press a large marshmallow onto each cookie and return them to the oven for a minute or two, then broil briefly until the marshmallow surface is golden brown.
- → Can I substitute ingredients for different flavors?
Yes, dark chocolate chips can replace semi-sweet ones, and a pinch of cinnamon adds warmth to the dough. Optional garnishes include mini chocolate chips and extra graham cracker crumbs.
- → How should I store these cookies?
Store cookies in an airtight container at room temperature for up to three days to maintain freshness and softness.
- → Are these cookies suitable for vegetarians?
Yes, these cookies are vegetarian-friendly but contain eggs and dairy from chocolate and marshmallows.