 Pin to Board
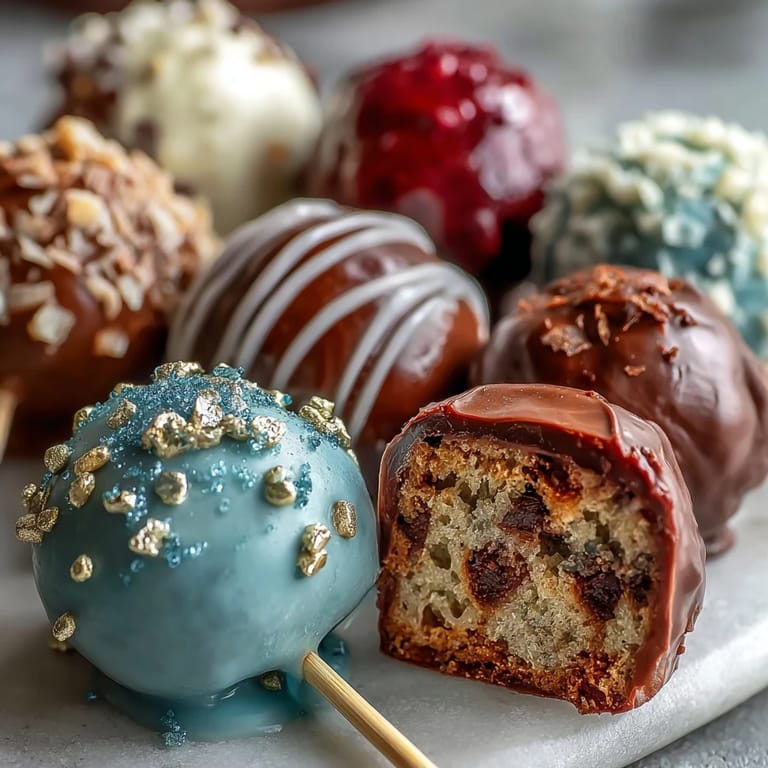
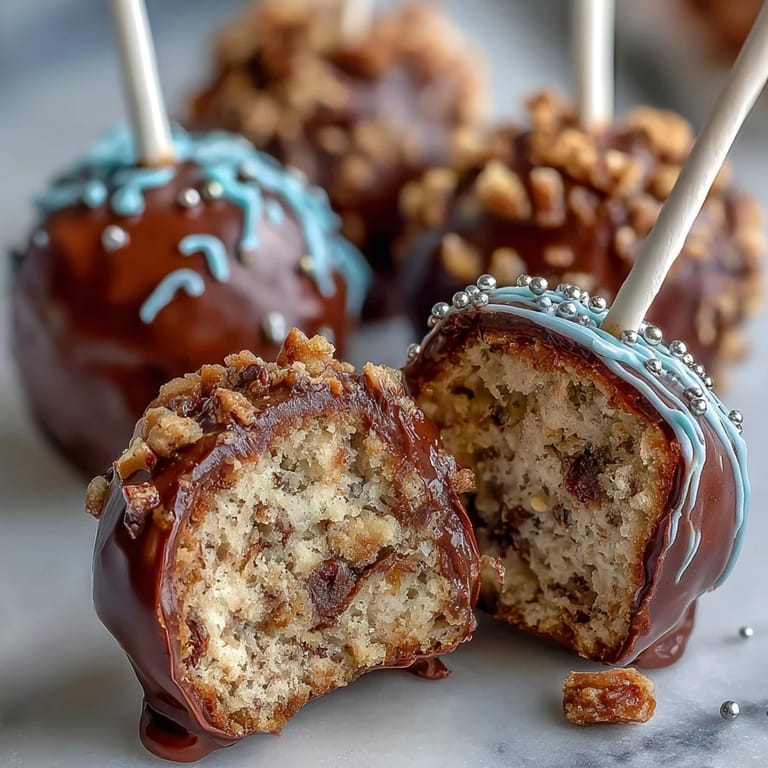
 Graduation is a milestone worth celebrating, and what better way to honor your graduate than with festive cake pops decorated in their school colors and topped with shimmering gold sprinkles? These bite-sized treats are as delightful to look at as they are to eat, combining moist cake, creamy frosting, and a smooth candy coating finished with a touch of golden sparkle. Whether you're planning a graduation party, sending care packages to students, or simply want to create something special for the big day, these cake pops deliver both visual impact and delicious flavor. With just a few simple steps and easily customizable colors, you can craft a dessert that perfectly matches your school spirit and creates lasting memories.
Pin to Board The beauty of these graduation cake pops lies in their versatility and personal touch. By choosing candy melts in your school's specific colors, you transform a simple dessert into a personalized celebration centerpiece. The process begins with a moist, flavorful cake that gets crumbled and mixed with homemade buttercream frosting, creating a rich, truffle-like base. Once shaped into perfect spheres and chilled, each ball is dipped in vibrant candy coating and adorned with gold sprinkles that catch the light beautifully. The result is a stunning array of handheld treats that look professionally made but are achievable for home bakers of all skill levels.
Ingredients
Tired of Takeout? 🥡
Get 10 meals you can make faster than delivery arrives. Seriously.
One email. No spam. Unsubscribe anytime.
- For the Cake: 1 box (about 400 g) vanilla or chocolate cake mix (plus ingredients listed on the box: usually eggs, oil, water)
- For the Frosting: 1/2 cup (115 g) unsalted butter, softened
- 1 1/2 cups (190 g) powdered sugar
- 1 tablespoon milk
- 1 teaspoon vanilla extract
- Pinch of salt
- For the Coating & Decoration: 450 g (16 oz) candy melts in two school colors
- 2 tablespoons vegetable shortening or coconut oil (optional, for smoother dipping)
- Gold sprinkles or edible gold glitter
- 24 lollipop sticks
- Styrofoam block (for drying pops)
Instructions
- Bake the Cake
- Prepare the cake mix according to package instructions. Let it cool completely.
- Make the Frosting
- Beat butter until creamy. Gradually add powdered sugar, then milk, vanilla, and salt. Beat until smooth and fluffy.
- Form the Cake Balls
- Crumble the cooled cake into a large bowl. Mix in 1/2 to 3/4 cup of frosting a little at a time until the mixture holds together but isn't too wet.
- Shape
- Roll the mixture into 24 evenly sized balls (about 1 tablespoon each). Place on a baking sheet lined with parchment paper. Chill in the refrigerator for at least 1 hour or freeze for 30 minutes.
- Insert Sticks
- Melt a small amount of candy melts. Dip the end of each lollipop stick into the melted candy, then insert halfway into each cake ball. This helps secure the sticks.
- Coat with Candy Melts
- Melt candy melts in separate bowls according to package instructions, stirring in shortening for a smoother finish if desired. Dip each cake pop into your chosen school color, gently tapping off excess.
- Decorate
- While the coating is still wet, sprinkle with gold sprinkles or edible gold glitter. Place upright in the Styrofoam block to set.
- Serve
- Allow coating to harden completely before serving or packaging.
Zusatztipps für die Zubereitung
The key to perfect cake pops is achieving the right consistency when mixing the cake and frosting. Start with less frosting and add more gradually—if the mixture is too wet, the balls won't hold their shape and may slide off the sticks during dipping. Conversely, if it's too dry, they'll be crumbly and difficult to coat smoothly. The chilling step is essential; it firms up the cake balls so they can withstand the warm candy coating without falling apart. When dipping, work quickly but gently, and give each pop a slight twirl to remove excess coating. If the candy melts become too thick while working, reheat them briefly in the microwave at 10-second intervals, stirring between each session. Using a Styrofoam block allows the pops to dry upright without touching any surface, ensuring a perfectly smooth finish all around.
Varianten und Anpassungen
While this recipe calls for vanilla or chocolate cake mix, you can experiment with different flavors like red velvet, lemon, or funfetti to add another layer of personality to your cake pops. For the frosting, consider adding almond extract instead of vanilla for a different flavor profile, or incorporate a tablespoon of cream cheese for extra richness. Beyond school colors, you can theme these pops for any celebration—use pastels for spring graduations, metallics for New Year's, or seasonal colors for holiday parties. Instead of gold sprinkles, try edible pearls, colored sanding sugar, or even small fondant decorations like mini diplomas or graduation caps. For a more sophisticated presentation, drizzle contrasting candy melts over the dried coating in thin lines, or dip just half of each pop in a second color for an ombré effect.
Serviervorschläge
These graduation cake pops make a stunning centerpiece when displayed upright in a decorative container filled with floral foam or decorated Styrofoam. Arrange them by color for a gradient effect, or alternate colors for a festive pattern. For individual servings, wrap each pop in a clear cellophane bag tied with ribbon in school colors, creating perfect party favors or gifts for graduates. Create a dessert table by pairing the cake pops with complementary treats like cupcakes, cookies, or a graduation cake, all decorated in matching school colors. For a memorable presentation, arrange the pops in the shape of the graduation year or spell out the graduate's initials. These treats are best enjoyed at room temperature and pair wonderfully with champagne, sparkling cider, coffee, or punch at graduation celebrations.
 Pin to Board
 These graduation cake pops are more than just a dessert—they're edible celebrations of achievement, hard work, and new beginnings. Each gold-dusted pop represents the bright future ahead for your graduate, while the school colors honor the journey that brought them to this moment. Whether you're a parent, friend, teacher, or the graduate yourself, making these treats is a labor of love that shows how much this milestone matters. They're conversation starters, photo-worthy moments, and delicious bites all wrapped into one. So gather your ingredients, choose your colors, and create something that will make your graduation celebration truly unforgettable. Here's to the graduates and the sweet memories you'll make together!
Common Questions
- → How do I ensure the cake balls hold together?
Gradually mix in frosting to the crumbled cake until the mixture is moist enough to shape but not sticky. Chill before shaping to help firm it.
- → Can I use different cake flavors?
Yes, vanilla or chocolate cake mixes work well. Feel free to experiment with other flavors to match your preference.
- → How do I make the coating smooth?
Adding a bit of vegetable shortening or coconut oil to the melted candy melts helps achieve a smoother dip and finish.
- → Any tips for securing the sticks?
Dip the stick ends in melted candy before inserting halfway into the cake balls; this sets and holds the stick firmly in place.
- → How should I store these pops after preparation?
Keep them in an airtight container at room temperature for up to 3 days or refrigerate up to 1 week to maintain freshness.