Pin to Board
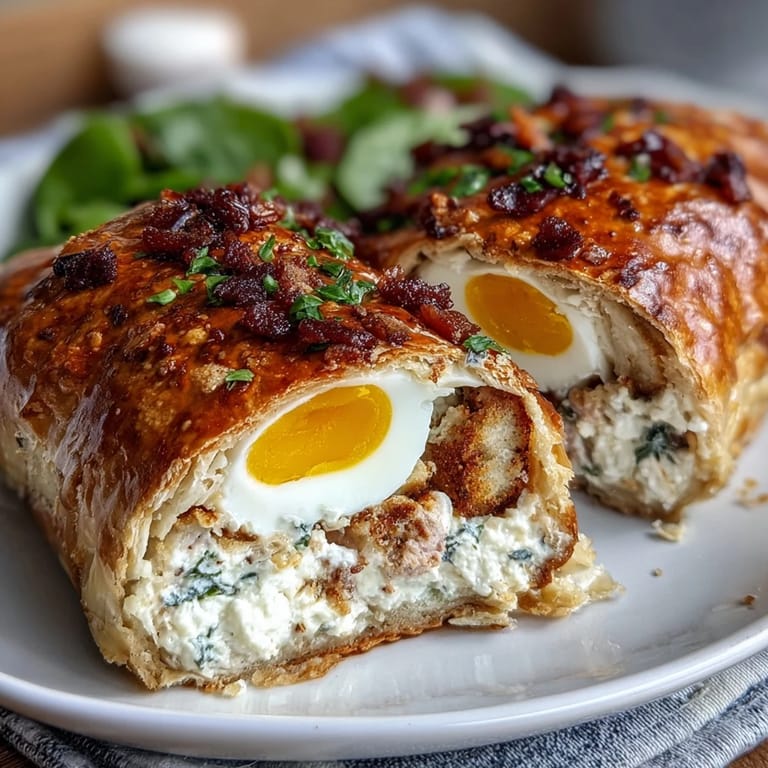
 My aunt brought this pie to Easter dinner three years ago, and the whole table went silent the moment she sliced into it—those golden eggs arranged like little surprises in the creamy filling announced themselves without a word. There's something about a dish that looks this impressive but comes together in less than two hours that changes how you think about feeding people. The flaky pastry, the savory ham and spinach, the soft ricotta binding everything together—it felt like Italy had quietly moved into her kitchen. I've made it seven times since, each time feeling like I'm in on a beautiful secret.
The first time I attempted this was a Sunday when my partner's family was coming over, and I'd only made it once before from written instructions. Halfway through assembling the eggs in their grooves, I realized I'd positioned three of them before remembering to add enough filling underneath—panic set in for exactly thirty seconds. But then I scooped a bit more ricotta mixture under the fourth egg, smoothed everything over, and watched the whole thing transform into exactly what my aunt's had looked like. Sometimes the small mistakes are exactly where the learning happens, and that pie turned out better than the first attempt anyway.
Ingredients
- Puff pastry (2 sheets, about 500 g): Keeping this thawed at room temperature prevents cracks and makes it easy to work with—cold pastry tears, warm pastry cooperates.
- Ricotta cheese (250 g): This is your base, and using the creamier Italian kind makes a difference in texture compared to the drier versions.
- Cooked ham (150 g, diced): Don't use the paper-thin deli slices; chunks or a decent thickness give you actual flavor in every bite.
- Baby spinach (100 g, wilted and chopped): Wilt it first, then squeeze it as dry as you can—excess moisture becomes your enemy in pie filling.
- Parmesan cheese (80 g, grated): Freshly grated matters here; pre-grated has anti-caking agents that make the filling grainy.
- Large eggs (3, for filling): These bind and enrich the mixture, making it silky when whisked in properly.
- Ground nutmeg (1/2 tsp): A tiny pinch that shouldn't announce itself but makes you wonder what you're tasting—that's the nutmeg doing its job.
- Black pepper and salt (1/2 tsp each): Taste as you go; ricotta can be bland until these are added.
- Olive oil (1 tbsp): Just enough to loosen the mixture and keep it from seizing up in the oven.
- Hard-boiled eggs (4 large, peeled): The stars of the show—cool them completely, then peel gently under running water so they stay intact.
- Egg wash (1 yolk and 1 tbsp milk): This is what makes the top turn that restaurant-quality golden brown.
Tired of Takeout? 🥡
Get 10 meals you can make faster than delivery arrives. Seriously.
One email. No spam. Unsubscribe anytime.
Instructions
- Heat your oven and prepare:
- Set the oven to 190°C (375°F) and grease your 23 cm springform or pie pan generously—this prevents sticking and makes unmolding easier later. If you're using a regular pie pan, a light coating of oil or butter is enough.
- Line with the first pastry sheet:
- Lay your thawed puff pastry into the pan, pressing it gently against the bottom and up the sides without stretching it too much. Leave a little overhang—it'll shrink slightly during baking anyway.
- Build the ricotta base:
- In a large bowl, combine the ricotta, diced ham, squeezed-dry spinach, Parmesan, the 3 raw eggs, nutmeg, pepper, salt, and olive oil. Mix gently until everything is incorporated but not overworked; you're aiming for creamy, not whipped.
- Create the first layer:
- Spread exactly half of your ricotta mixture evenly across the pastry-lined pan, using a spatula to smooth it out. This base layer cushions your eggs and keeps them from sinking.
- Nest the hard-boiled eggs:
- Using your fingers or the back of a spoon, create four shallow grooves in a line across the filling. Gently press each hard-boiled egg into these grooves so they sit horizontally, nestled but not buried.
- Top with remaining filling:
- Spoon the rest of the ricotta mixture over and around the eggs, smoothing the top so everything is level. The eggs should be mostly covered but hints of them visible just before baking.
- Seal with the second pastry sheet:
- Place the second sheet of puff pastry over the filling and press the edges down to seal them with the bottom pastry. Trim any excess, then crimp the edges decoratively with a fork or your fingers for a finished look.
- Apply the egg wash:
- Whisk the egg yolk with milk until smooth, then brush this generously over the top pastry. This creates that glossy, golden finish that makes people think you're a pastry professional.
- Create steam vents:
- Using a sharp knife, make three or four small slits in the pastry—just enough for steam to escape without making the top collapse. These shouldn't be huge; think tiny decorative cuts.
- Bake until golden:
- Bake for 40 to 45 minutes until the pastry is puffed and deep golden brown. If the top starts browning too quickly, tent it loosely with foil for the last 10 minutes.
- Rest before serving:
- Let the pie cool for at least 20 minutes—this allows the filling to set so it doesn't run when you slice. Warm is perfect, but it's equally good at room temperature.
 Pin to Board
 There was a moment last spring when I sliced this pie for my neighbor, who'd been dealing with a rough few weeks, and she actually teared up a little. Not because it was extraordinary, but because someone had taken the time to make something this thoughtful—something with visible care built into every layer. That's when I realized this isn't just a pretty pie; it's a way of saying you matter enough for me to spend an afternoon in the kitchen.
Why This Pie Works for Celebrations
Easter and spring gatherings have a particular energy—they're about renewal and gathering after long winters, and this pie somehow captures that feeling. The eggs are symbolically meaningful without being heavy-handed about it, and the flavors are light enough that nobody feels weighed down after eating it. Plus, it photographs beautifully, which sounds shallow until you realize that taking a photo and sharing it becomes part of how people remember the day.
Making It Your Own
The beauty of this recipe is that it invites variations without losing its essence. You can swap spinach for Swiss chard or kale if that's what you have, or add fresh herbs like parsley, basil, or dill to the filling for brightness. Some people add a handful of fresh ricotta cheese instead of all cooked ham for a lighter version, while others sneak in a layer of sautéed mushrooms or caramelized onions.
Serving and Storage Wisdom
Serve warm with a crisp green salad on the side—the acidity cuts through the richness and makes the whole meal feel balanced and elegant. It's equally wonderful at room temperature, which means you can make it hours ahead and avoid a last-minute rush. This pie keeps well refrigerated for up to three days, though honestly it rarely lasts that long in most homes.
- Reheat gently in a 160°C oven for about 10 minutes if you want warm slices without drying out the pastry.
- A simple lemon vinaigrette on your side salad echoes the brightness of the herbs and eggs.
- Pair it with a light white wine or even a rosé if you're making this a proper celebration.
 Pin to Board
 This pie has become one of those dishes I reach for when I want to feed people something that tastes both familiar and special, without spending all day in the kitchen. Make it once, and you'll understand why it keeps getting requested.
Common Questions
- → What pastry works best for this savory pie?
Use thawed puff pastry sheets for a light, flaky crust that complements the creamy filling.
- → Can I substitute the spinach in the filling?
Yes, Swiss chard or kale are excellent alternatives that maintain a similar texture and flavor.
- → How do the hard-boiled eggs affect the pie’s texture?
The whole eggs create a striking cross-section and add a tender, rich bite amid the creamy filling.
- → What’s the best way to achieve a golden crust?
Brush the top pastry with a mixture of egg yolk and milk before baking for a shiny, golden finish.
- → How long should the pie cool before slicing?
Let the pie cool at least 20 minutes after baking to ensure clean slices and set filling.